Your First Job
A simple hand of bridge with an opening bid of 1 of your longest suit. Learn about drawing trumps.

|
Watch on YouTube |
A simple hand of bridge with an opening bid of 1 of your longest suit. Learn about drawing trumps.
|
|
Watch on YouTube |
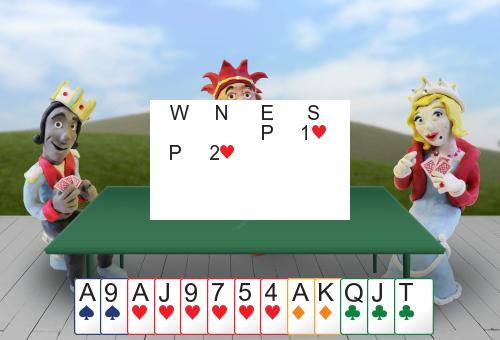
Hi everyone, if you're beginning bridge this is a great hand to learn some simple bidding and card play.
East has passed. We are opening the bidding here with 19 high card points. I can open 1♥, my longest suit, and North bids 2♥.
That 2♥ bid tells me that we have a heart fit, so we've got at least eight hearts between the two hands, and North is showing between six and nine points. So I'm in a really good position now to decide how high to bid, and this is a very common thing that happens with bridge bidding. One player shows their point count reasonably accurately, and then that person's partner can decide how high to bid.
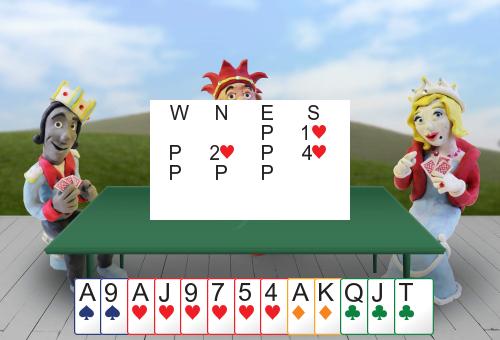
North is showing six to nine points. I've got 19, so we've got somewhere between 25 and 28 high card points. That's enough to bid 4♥, so nice and simple. Simple options are often the best!
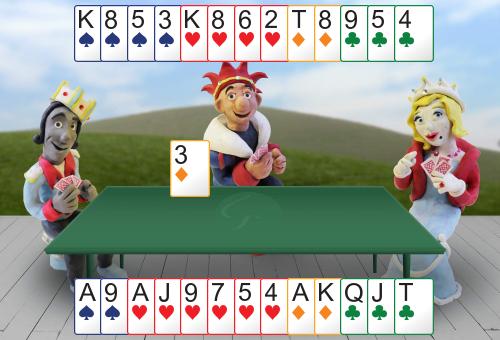
West leads the ♦3, and we're looking pretty good, so let's play this one through. First job here is going to be to draw trumps. We're getting rid of the opposition's trumps.
I'm going to win the ♦K or the ♦A, doesn't matter which one. And notice that we have 10 hearts between the two hands, so the opposition have three. I'm going to play a low heart over to the king, and West discards the two of clubs. That's all fine, so that means East still has two hearts left, and you can see they're the ♥Q and ♥T. So when I play another heart, and East plays the ♥T, I'm guaranteed to win the trick here with the ♥J, because West has got no hearts left. I'm taking a finesse.
Now let's draw that last trump, and that's all the trumps gone from the opposition's hands. Next thing I'm going to do is attack the club suit.
Why clubs? Because we are missing the ♣A and ♣K, and look at those lovely spades and diamonds. Well again, this is a very common theme in bridge. What we're going to do is lose the ♣A and ♣K early, while we've still got good cards and the other suits, and we can use those good cards and the other suits to regain the lead once we lose the lead.
When I play the ♣Q, ♣J, ♣T, doesn't matter which one, I'm going to lose to the ♣K or the ♣A, but I always had to lose to the ♣A and ♣K sometime. Now West has returned a diamond, and that's fine because we've still got that ♦K to regain the lead. We've still carefully kept our trumps there to help us regain the lead, and now I can play another club.
So it's the ♣Q gone, the ♣A gone, play the ♣J, which loses to the ♣K, but now my CTs is a winner. I can regain the lead, take that ♣T, which we worked so hard to establish, and now the rest of the tricks are mine. ♠K and three heart tricks.